관계 설정
이번 장에서는 엔티티 간의 관계를 설정하고, API를 작성하는 방법에 대해 설명합니다.
엔티티 정의
유저 엔티티와 마찬가지로, Entities 탭에서 엔티티 추가를 클릭하고, Post라는 이름으로 엔티티를 생성합니다.
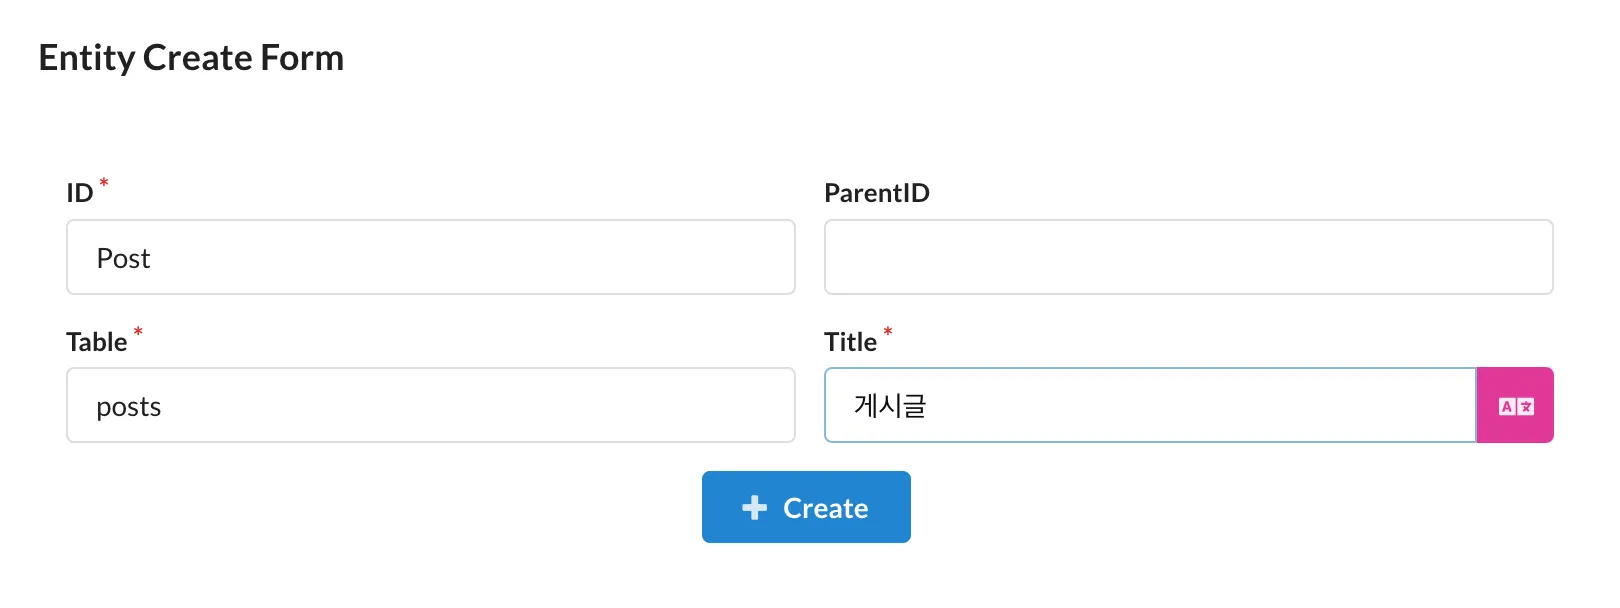
Post 엔티티에는 아래와 같은 필드를 추가합니다.
title: 게시글 제목 (타입string)content: 게시글 내용 (타입text)author: 게시글 작성자 (타입relation)
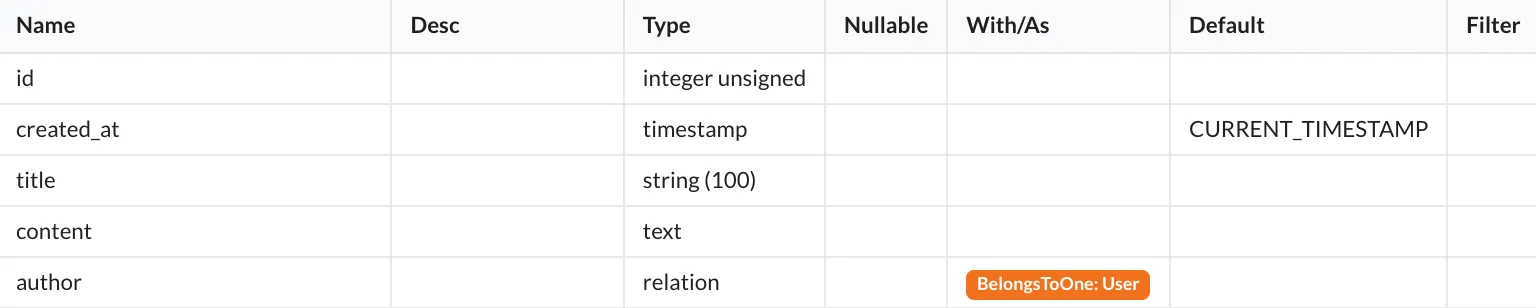
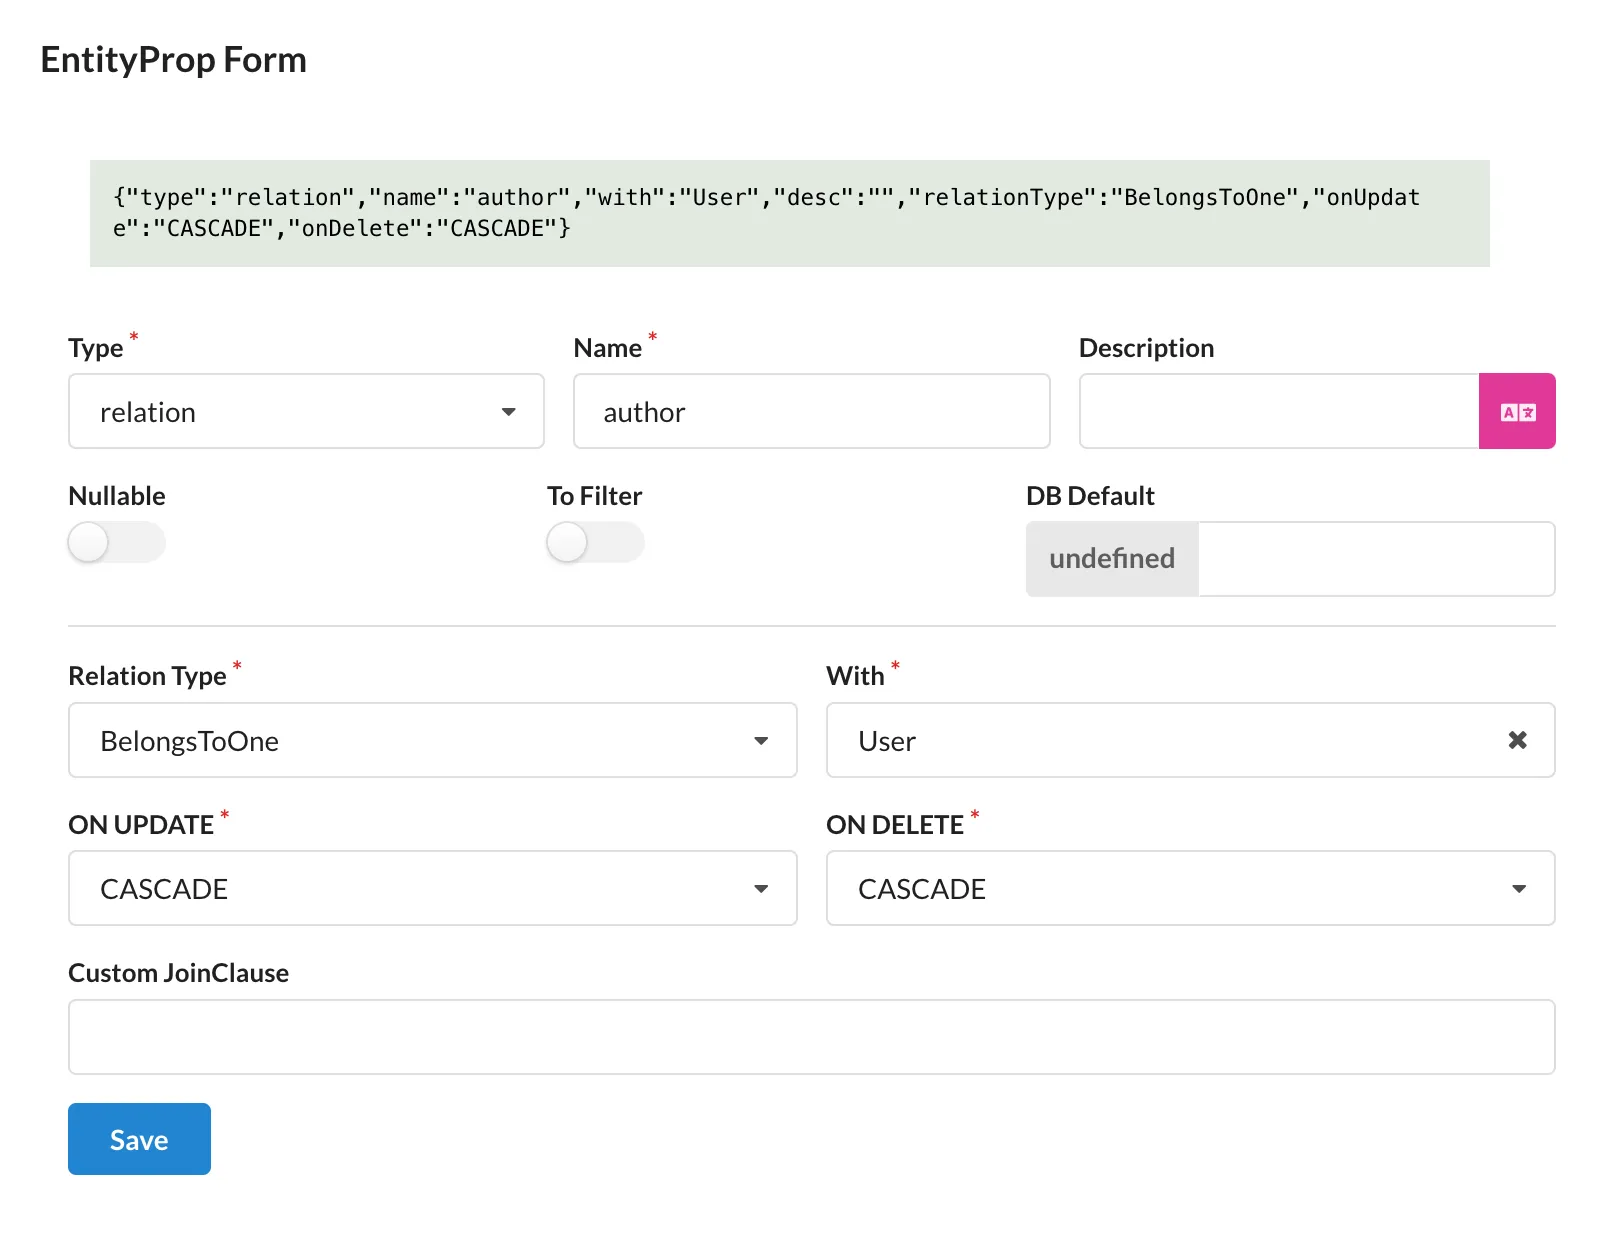
author 필드는 User 엔티티와의 관계를 설정합니다. Type을 relation으로 설정하면, 아래에 Relation Type, With 등 조인 관련 설정이 나타납니다. Relation Type을 BelongsToOne으로 설정하고, With를 User로 설정합니다.
필드를 모두 추가했으면, DB Migration 탭에서 마이그레이션 파일을 생성합니다. 게시글 테이블을 생성하는 마이그레이션 파일과 유저 테이블과의 관계를 설정하는 마이그레이션 파일이 생성됩니다. BelongsToOne 관계를 설정하면, 자동으로 외래키가 생성되며, ${entityName}_id 컬럼이 생성됩니다.
// create__postsexport async function up(knex: Knex): Promise<void> {  return knex.schema.createTable("posts", (table) => {    // columns    table.increments().primary();    table      .timestamp("created_at")      .notNullable()      .defaultTo(knex.raw("CURRENT_TIMESTAMP"));    table.string("title", 100).notNullable();    table.text("content").notNullable();    table.integer("author_id").unsigned().notNullable();    table.uuid("uuid").nullable();
    // indexes    table.unique(["uuid"]);  });}
export async function down(knex: Knex): Promise<void> {  return knex.schema.dropTable("posts");}
// foreign__posts__author_idexport async function up(knex: Knex): Promise<void> {  return knex.schema.alterTable("posts", (table) => {    // create fk    table      .foreign("author_id")      .references("users.id")      .onUpdate("CASCADE")      .onDelete("CASCADE");  });}
export async function down(knex: Knex): Promise<void> {  return knex.schema.alterTable("posts", (table) => {    // drop fk    table.dropForeign(["author_id"]);  });}
마이그레이션을 모두 실행하면, 게시글 테이블이 생성되고, 유저 테이블과의 관계가 설정됩니다.
API 작성
위에서 생성한 게시글 엔티티를 이용하여 게시글 작성, 조회, 수정, 삭제 API를 작성해보겠습니다. 우선 Scaffolding 탭으로 이동하여 게시글 엔티티에 대한 모델 코드를 생성합니다.
게시글 작성 API
먼저, 게시글 작성 API를 작성해보겠습니다. 게시글 작성 API는 게시글 제목, 내용, 작성자 아이디를 입력받아 게시글을 생성하는 API입니다.
게시글 작성 API의 파라미터는 스캐폴딩 과정에서 생성된 PostSaveParams를 사용하여 작성합니다. 아직 로그인이 구현되지 않았기 때문에 author_id를 직접 입력받습니다. 가이드 - 인증 및 인가에서 로그인한 유저의 정보를 얻는 방법을 확인할 수 있습니다.
// Post - CreateParamsexport const PostCreateParams = PostSaveParams.pick({ title: true, content: true, author_id: true,});export type PostCreateParams = z.infer<typeof PostCreateParams>;다음으로, 게시글 작성 API를 작성합니다. post.model.ts 파일을 열고, 아래와 같이 메서드를 작성하고, @api 데코레이터를 추가합니다.
import { NotFoundException, api, UnauthorizedException } from "sonamu";import { PostSubsetKey, PostSubsetMapping } from "../sonamu.generated";import { postSubsetQueries } from "../sonamu.generated.sso";import { PostCreateParams, PostSaveParams } from "./post.types";
@api({ httpMethod: "POST" })async create(cp: PostCreateParams): Promise<number> {  const sp: PostSaveParams = {    ...cp,  };
  const [id] = await this.save([sp]);
  return id;}
이제 sonamu.generated.http 파일을 이용하여 해당 API를 호출해보겠습니다. author_id는 이전에 생성한 유저의 id를 사용합니다.
POST {{baseUrl}}/api/post/createContent-Type: application/json
{ "cp": {  "title": "TITLE", "content": "CONTENT", "author_id": 1 } }
위와 같이 요청을 보내면, 게시글이 생성되고, 생성된 게시글의 id가 반환됩니다.
게시글 조회 API
다음으로, 게시글 조회 API를 작성해보겠습니다. id를 이용한 게시글 조회 API는 모델 스캐폴딩에서 findById 메서드로 구현되어 있습니다. 여기에 제목을 이용하는 로직을 추가해보겠습니다. PostListParams에 새로운 필드를 추가하여 구현할 수도 있겠지만, PostBaseListParams의 search 필드와 keyword를 사용하여 작성합니다. search에는 조회할 필드를 입력하고, keyword에는 검색어를 입력합니다.
Sonamu UI의 Entities 탭에서 Post 엔티티를 클릭하면, Enums 탭에서 PostSearchField를 확인할 수 있습니다. PostListParams의 search 필드는 해당 열거형을 사용하기 때문에, 제목으로 게시글을 조회할 수 있도록 PostSearchField에 title을 추가합니다.
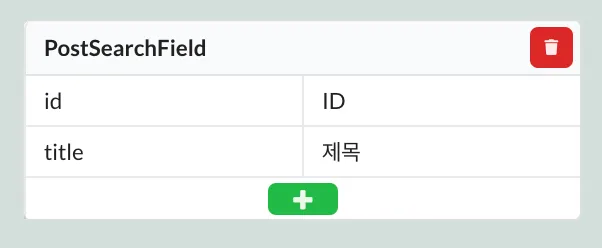
그런 다음 게시글 엔티티 파일을 보면, PostSearchField 열거형에 title이 추가된 것을 확인할 수 있습니다.
{  ...
  "enums": {    "PostSearchField": { "id": "ID", "title": "제목" }  }}
이제 findMany 메서드에서 search 필드의 title을 이용하여 게시글을 검색하는 로직을 추가합니다.
@api({ httpMethod: "GET", clients: ["axios", "swr"], resourceName: "Posts" })async findMany<T extends PostSubsetKey>( subset: T, params: PostListParams = {}): Promise<ListResult<PostSubsetMapping[T]>> { ...
// search-keyword if (params.search && params.keyword && params.keyword.length > 0) { if (params.search === "id") { qb.where("posts.id", params.keyword); } else if (params.search === "title") { // title 검색 추가 qb.where("posts.title", "like", `%${params.keyword}%`); } else { throw new BadRequestException( `구현되지 않은 검색 필드 ${params.search}` ); } }
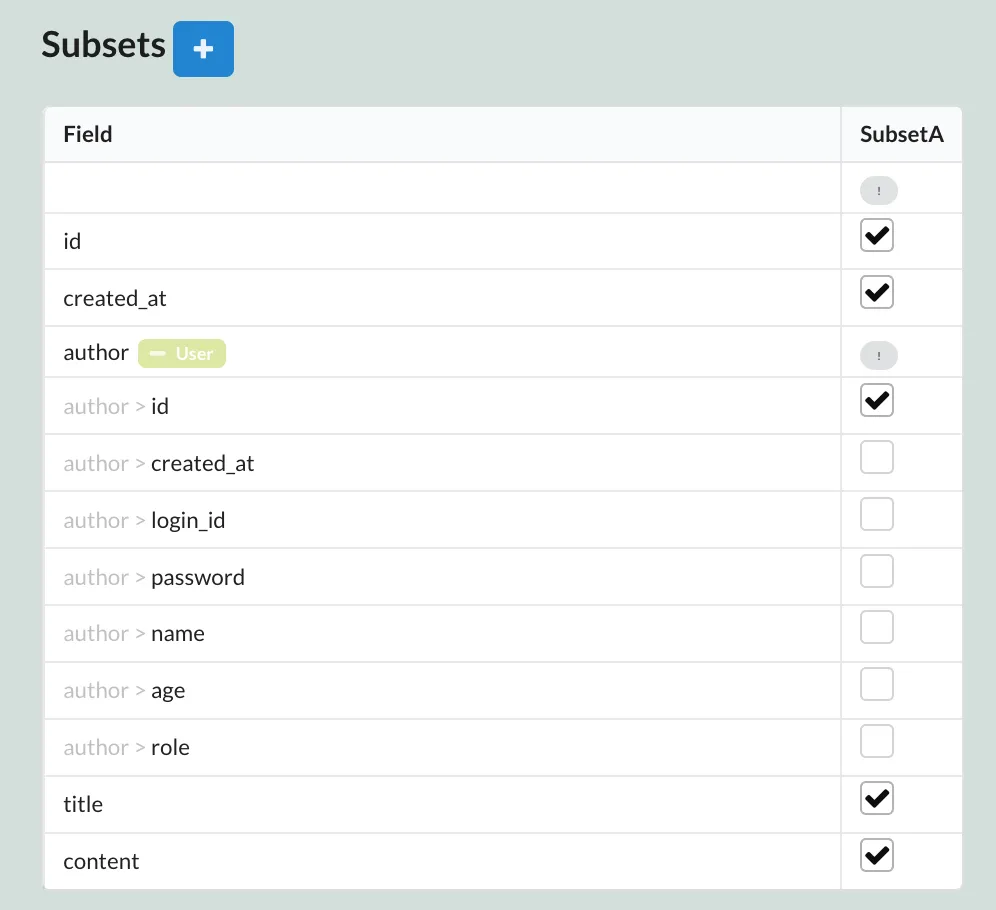
...}findMany 수정이 끝났으면 조회 결과로 확인하고 싶은 필드를 서브셋으로 설정합니다. Sonamu UI의 Entities탭으로 이동한 다음, 게시글 엔티티를 선택하고, 우측 하단에 보이는 Subsets 테이블에서 필드를 선택합니다.
이제 sonamu.generated.http 파일을 이용하여 해당 API를 호출해보겠습니다. search와 keyword 필드를 이용하여 게시글을 검색할 수 있습니다.
GET {{baseUrl}}/api/post/findMany ?subset=A ¶ms[search]=title ¶ms[keyword]=TITLEContent-Type: application/json위와 같이 요청을 보내면, 제목에 TEST가 포함된 게시글이 반환됩니다.
{ "rows": [ { "id": 1, "created_at": "2024-04-23 18:03:43", "title": "TITLE", "content": "CONTENT", "author_id": 1 } ], "total": 1}게시글 수정 API
게시글 수정 API는 게시글 작성 API에 수정 로직을 추가하여 작성합니다. 게시글의 id가 주어지면 해당 게시글을 조회하고, 작성자와 현재 유저가 일치하는지 확인한 후 게시글을 수정합니다. 먼저, PostCreateParams를 PostSaveMineParams로 이름을 변경하고, id 필드를 추가합니다.
// Post - SaveMineParamsexport const PostSaveMineParams = PostSaveParams.pick({ id: true, title: true, content: true, author_id: true,});export type PostSaveMineParams = z.infer<typeof PostSaveMineParams>;메서드 이름을 saveMine으로 변경하고, 작성자와 현재 유저가 일치하는지 확인하는 로직을 추가합니다.
@api({ httpMethod: "POST" })async saveMine(smp: PostSaveMineParams): Promise<number> {  if (smp.id) {    const post = await this.findById("A", smp.id);    if (post.author_id !== smp.author_id) {      throw new UnauthorizedException("본인의 글만 수정할 수 있습니다.");    }  }
  const sp: PostSaveParams = {    ...smp,  };
  const [id] = await this.save([sp]);
  return id;}
이제 sonamu.generated.http 파일을 이용하여 해당 API를 호출해보겠습니다. id를 이용하여 게시글을 수정할 수 있습니다.
POST {{baseUrl}}/api/post/saveMineContent-Type: application/json
{ "smp": { "id": 1, "title": "제목 수정", "content": "CONTENT", "author_id": 1 } }
그리고 게시글을 조회하여 수정된 내용을 확인할 수 있습니다.
GET {{baseUrl}}/api/post/findMany ?subset=A ¶ms[id]=1
// 결과{ "rows": [ { "id": 1, "created_at": "2024-04-23 18:03:43", "title": "제목 수정", "content": "CONTENT", "author_id": 1 } ]}게시글 삭제 API
게시글 삭제 API는 게시글 id를 이용하여 게시글을 삭제하는 API입니다. id를 이용하여 게시글을 조회하고, 해당 게시글의 작성자와 현재 유저가 일치하는지 확인합니다.
@api({ httpMethod: "POST" })async delMine(id: number, author_id: number): Promise<number> {  const post = await this.findById("A", id);  if (post.author_id !== author_id) {    throw new UnauthorizedException("본인의 글만 삭제할 수 있습니다.");  }
  return this.del([id]);}
이제 sonamu.generated.http 파일을 이용하여 해당 API를 호출해보겠습니다. id를 이용하여 게시글을 삭제할 수 있습니다.
POST {{baseUrl}}/api/post/delMine
{ "id": 1, "author_id": 1 }Content-Type: application/json